Going back two posts, you saw some early images of my UI. I knew that I was designing the project to be so complex that I needed some form of status monitor so that I didn't have to memorize what the helmet was doing at any one instant. We are visual creatures. We can process a lot of information in a very short amount of time by simply looking at something. So rather than design something with a convoluted series of beeps, whistles, and vibrations like modern smartphones, I needed something visual.
Lets pull up an image from two posts ago:
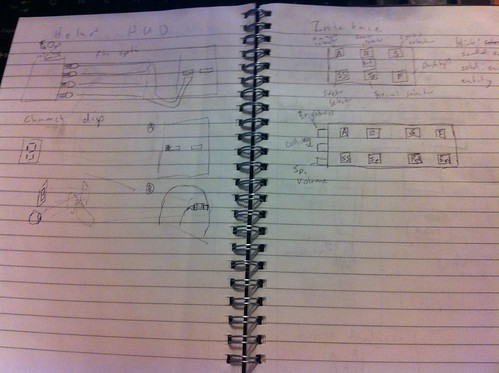
Pay attention to the left hand side. You see a couple of sketches. The top is an idea I had to use fiber optics to remotely locate status LEDs. The color and pattern would be used to indicate what's going on. Not exactly pretty or easy to remember.
The second design from the sketchbook is a alphanumeric display/7 segment reflected into the periphery of the eye. This mirror served to give greater flexibility of the placement of LED box, and potentially adjust the perceived size through lensing. A bit better than the fiber optic option, since it could be more recognizable symbols and letters. But still very limited in it's capabilities.
There was also one key problem with both ideas: vision. The lack of vision though the helmet to the outside world. Back in this project's infancy, I assumed I would use a transparent sub-visor and I would see between the LEDs. Well, that went by the wayside pretty quick as the dot pitch of the LEDs got closer and closer together and I realized the shear amount of wiring that would be between my eyes and the outside world.
I got around this problem by using the CMOS camera, combined with some video goggles and of course the on screen display chip. But that now meant I had to design a proper heads up display. And I came up with this:
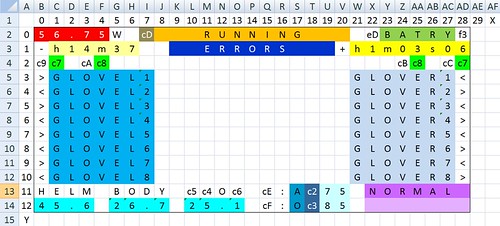
So what are you looking at? Well:
1) Display Status Bar. This shows what is currently running on the display.
2) Randomize Indicator. This indicators whether or not the display is set to randomly select a new animation after a certain amount of time.
3) Current Power Consumption. Show in watts. This is to helpme judge the power draw of the system, and whether I should take actions to reduce power consumption.
4) Remaining Time. At the current power consumption, how much time is left in the battery.
5) Battery Bar. Battery icon like you find on almost any battery powered device.
6) Run Time. The clock showing how long it's been powered up for. Always useful for keeping track of things.
7) On/Off Indicators. Indicators symbols for various ancillary devices. More on these devices in posts to come.
8) Error Messages. A place for various error messages to occupy.
9) Menu Soft Buttons. These are soft buttons that correspond to the 8 buttons on each gloves. I use a fairly straightforward menu tree to organizer everything.
10) Temperature Indicators. Readings from various sensors on the status of me and my cooling system.
11) Climate Control. A bunch of settings for the climate control system.
12) Side Bars Status. What's currently running on the side bars.
All in all, pretty comprehensive. It's had a few minor evolutionary steps, but mostly has followed this setup since I first laid it out. This should also give you some indications of sub-systems and components I will detail in the future.
Has nothing to do with this post, but this popped up on Hack-a-Day and I figured you might be interested.
ReplyDeletehttp://hackaday.com/2011/06/22/building-diy-blinkm-clones/#more-46755
I did, thanks. Unfortunately things like the blinkM and the shiftbrite are just too complicated to deploy on a scale as large as this helmet.
ReplyDelete