And no, it's not Jaws, that's only 2 notes. We can't all be John Williams.
But first, a house keeping video.
Right, so, that's out of the way. This is a lot of 'house keeping' animations, ones that I had sitting in notebooks and as little notes on my design docs. I had a 'lull' in code work so they came to life. If you're so inclined, have a read of the description.
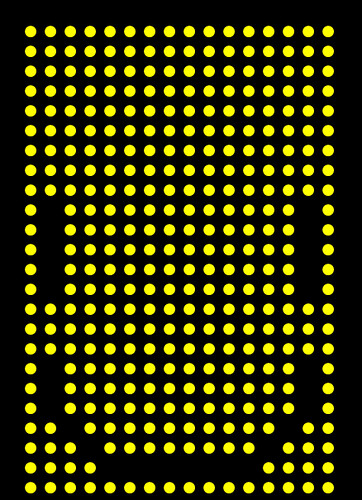
Now, onto the good stuff. I have a few static images in there (if you look carefully you'll see my Alma mater). Around 0.38 it gets interesting.
This was a continuation of my 'must include sound' goal, as well as being one of the earliest ideas I came up with for animations, behind the pinwheel, rain, and the spectrum analyzer. Who doesn't know the 5 note progression from Close Encounters of the Third Kind? I remember knowing that note progression even before I had seen the film. In this video it's accomplished with a rather meek buzzer, so it sounds rather grungy.
The animation came about as a sort of 'happenstance.' I updated the arduino IDE and noticed that a new function had been added to the base library: tone(). Turns out you could tone generate on any of the pins. Spiffy. A bit of research into note frequencies and several hours of staring at the film footage and I had a timing and color correct reproduction of the movie scene. Well, as best I could generate that is. It's hard to tell in the video, but yes, the colors are the same as the ones used on the big 'light board' in the background of the film. The placement is different, but that was a style decision on my part.
the fireworks you've seen before, but this is a 'fixed' version. Brownie points to the person who figures out what was wrong in the original and was fixed in this version.
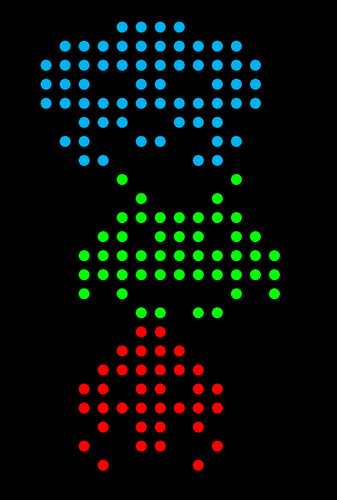
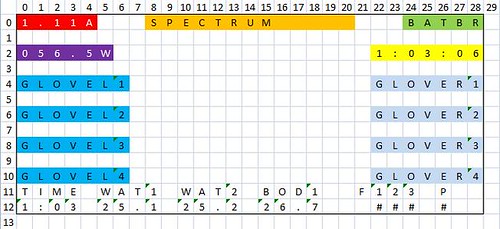
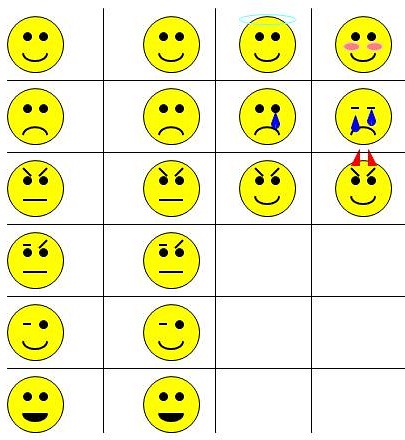
Finally in the video, another one of my infinitely useful tool functions. Text. It took a painfully long time and painfully levels of creative energy to make ASCII characters that are only 4 pixels wide by 6 pixels tall. You have no idea how hard it is to replicate the alphabet with only 24 dots. But that pain was singular and it made if much easier to have text marques. And with text marquees is much easier to present technical information to a viewer. While all the other static images, emotions, etc, it should be easy to carry on a coversation (at least a basic one). But when asked specific, direct questions, it's best to rely on ordinary text. Imagine giving signals of some sort to indicated any of the stuff presented in the text. Yikes.
Wednesday, February 23, 2011
Monday, February 21, 2011
DPHP 7 - Reinventing the Wheel... Well, Really, the Line
While I did lie before, this time it's true, I had actually moved to the Arduino Mega at this point. And then things got really complicated.
This was a the age when I was fighting an uphill battle with my experience and the lack of 'assistance' and 'direction' I was getting from others. For instance, that first animation, took maybe an hour to code and debug. After probably 6 hours of failing to write my own line drawing routine.
The problem was, I had never heard of Breshenham's line algorythm. Why should I have, I'm an aerospace major and had only taken basic coding and numerical methods. I hadn't taken a graphics class, heck, I hadn't even taken a autonomous systems class (though I was interested but my course load and schedule never allowed it). I never had need to draw a line from A to B. The truely sad part was how hard it was for me to finally combine the right search terms to get a hint at Breshenham. It wasn't pretty.
After finally being able to draw a line from one point to another, I could accomplish much of the above animations. The bouncing line is pretty simple, track a few points and connect them with points. The pinwheel is just some lines from the center and some fading code thrown in. So this must be what it's like when you code with reuse and functionality in mind. It's wonderful.
I was starting to realize that with enough processing space and code space, you could accomplish a lot more. Processing power/time isn't so much a problem more often than not, since you can often trade memory usage for speed. And it is amazing what you can accomplish even when your processor does one thing and only one thing at a time. And it's most amazing what you can cobble together when you have no idea what you're doing.
Thursday, February 17, 2011
DPHP 6 - Fighter Plane in a Helmet
It's amazing how quickly the one a day promise falls by the wayside. Excuses excuse, etc etc, blah blah blah. The honest fact is it's a work week from hell, where the world is expected and as much as possible needs to be delivered. So I'm behind a few days. Here's getting back on the bus.
You may be noticing a trend here. For the longest time, my youtube videos have been the best kept records of this project. I often put far too technical an explanation into the description, but at least it's somewhere.
I've made mention of what you're seeing about before. I once again, there's a nice narative to explain what's going on.
Simply put, there is no way to see through the LED display matrix. Even if the sub visor were made transparent, the backglow of the LEDs would be bright enough and close enough to the face to completely wash out any other light source, let alone causing potential damage from the proximity and brightness. So how does one fix this? Well, the obvious choice is with a camera and video goggles. The camera can be mounted elsewhere in the helmet with an adequate view point, and the goggles go infront of the eyes, where they do the most good.
But clearly, that is too simple a solution, far to simple for the scope and scale of this project. After some research, I came up an On Screen Display (OSD) prototyping chip on sparkfun, based on a MAX7456. This way I could overlay text onto a standard NTSC video signal, i.e. what coming out of the camera and going into the video goggles. Bingo.
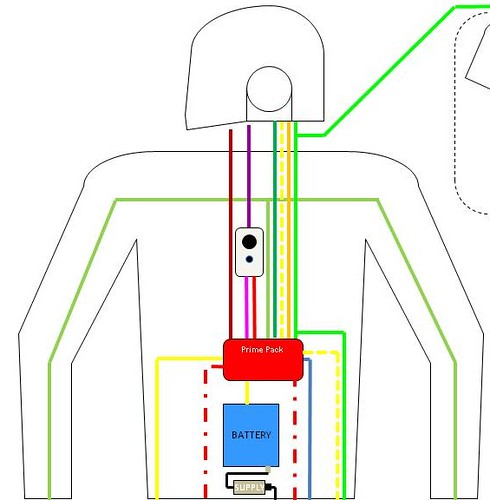
And another one of my main engineering hurdles rears it's head. Animations, for the most part, require almost all of the processing time of the microcontroller. Maybe not the ones you've seen in the first and second round animations, but some of my later ones certainly require every single cycle in order to have a reasonable refresh rate. Where am I going to find the processing time/cycles to run all the background stuff to drive an OSD chip? The answer is a second controller, known as the UI controller, in addition to the one used to run the animations, now known as the SHOW controller.
Ok, so now I have a whole second microcontroller to play with, and it's job is only to interface with the user, tell the SHOW what to do. Here's a breakdown of the features:
Power
-Report the voltage of the primary and secondary power batteries
-Report the amp draw from the primary battery
-Integrate voltage and amp draw to calculate used power, and remaining power in the battery
Climate Control
-Report the temperatures measured by a couple of sensors
-Turn on and off cooling devices based on temperature data
-Provide automation of the climate control functions
Status Display (OSD)
-Report what is currently running on the display
-Report the current menu interface state
-Report climate control and power status information
Command Control
-Accept inputs from the user
-Track state information to/from the user and to/from the SHOW microcontroller
-Send appropriate commands to the SHOW microcontroller
So how is all this accomplished? Well, I have the following bits and bobs connected to the UI micro:
component - purpose - protocol
>MAX7456 - on screen display - SPI
>ACS712 - current sensor - ADC
>DS18B20 - temperature sensor - 1Wire
>Voltage divider - Voltage sensor - ADC
>Glove buttons - user input - I2C
>PNP MOSFET - power switching to cooling components - DIO
We'll save how all this breaks down for another day. There are a lot of systems and subsystems to explain, that's for sure.
You may be noticing a trend here. For the longest time, my youtube videos have been the best kept records of this project. I often put far too technical an explanation into the description, but at least it's somewhere.
I've made mention of what you're seeing about before. I once again, there's a nice narative to explain what's going on.
Simply put, there is no way to see through the LED display matrix. Even if the sub visor were made transparent, the backglow of the LEDs would be bright enough and close enough to the face to completely wash out any other light source, let alone causing potential damage from the proximity and brightness. So how does one fix this? Well, the obvious choice is with a camera and video goggles. The camera can be mounted elsewhere in the helmet with an adequate view point, and the goggles go infront of the eyes, where they do the most good.
But clearly, that is too simple a solution, far to simple for the scope and scale of this project. After some research, I came up an On Screen Display (OSD) prototyping chip on sparkfun, based on a MAX7456. This way I could overlay text onto a standard NTSC video signal, i.e. what coming out of the camera and going into the video goggles. Bingo.
And another one of my main engineering hurdles rears it's head. Animations, for the most part, require almost all of the processing time of the microcontroller. Maybe not the ones you've seen in the first and second round animations, but some of my later ones certainly require every single cycle in order to have a reasonable refresh rate. Where am I going to find the processing time/cycles to run all the background stuff to drive an OSD chip? The answer is a second controller, known as the UI controller, in addition to the one used to run the animations, now known as the SHOW controller.
Ok, so now I have a whole second microcontroller to play with, and it's job is only to interface with the user, tell the SHOW what to do. Here's a breakdown of the features:
Power
-Report the voltage of the primary and secondary power batteries
-Report the amp draw from the primary battery
-Integrate voltage and amp draw to calculate used power, and remaining power in the battery
Climate Control
-Report the temperatures measured by a couple of sensors
-Turn on and off cooling devices based on temperature data
-Provide automation of the climate control functions
Status Display (OSD)
-Report what is currently running on the display
-Report the current menu interface state
-Report climate control and power status information
Command Control
-Accept inputs from the user
-Track state information to/from the user and to/from the SHOW microcontroller
-Send appropriate commands to the SHOW microcontroller
So how is all this accomplished? Well, I have the following bits and bobs connected to the UI micro:
component - purpose - protocol
>MAX7456 - on screen display - SPI
>ACS712 - current sensor - ADC
>DS18B20 - temperature sensor - 1Wire
>Voltage divider - Voltage sensor - ADC
>Glove buttons - user input - I2C
>PNP MOSFET - power switching to cooling components - DIO
We'll save how all this breaks down for another day. There are a lot of systems and subsystems to explain, that's for sure.
Sunday, February 13, 2011
DPHP 5 - Code Occupies the Space of it's Container
Yep, as the video title suggests, this was my second collection of animations. Why is this one special? Well, at this point I had moved off of the bog standard Arduino Diecimila with it's ATega168 processor to an Arduino Mega with a ATmega1280. Why? Well, the 168 has 1kB of SRAM, or 'operating memory' similar to the RAM in your computer or laptop. The difference is when you run out of operating memory on a microcontroller, you don't have a page file to save your bacon. Instead, it all goes to pot and it's nearly impossible to tell why or how. And why is 1kB not enough space? Well, let's look at the display. I'm sure people hate math but bear with me.
One pixel of the display needs 12bits of information to describe it, in other words 4 bits per color. That means that the whole display, which is 24x16 pixels, is 4608 bits, or divide you divide by 8, 576 bytes of information. So, just to store a 'full copy' of all the information needed to send ONE frame to the display, you would be using over half of the available memory. Specifically, 576/1024 = 56.25% of your available memory. Yikes.
This made things like 'hue based colors' impossible with only 1kB of memory. In the hue based color system I use, a single number correlates to a part of the color spectrum I can reproduce on my system (4096 total colors) at a fixed brightness. Therefore, I fix the 'saturation' and 'brightness' values used in standard HSB/HSL color schemes. One of these color values, for one pixel, requires a byte to store. So that's 384 bytes to store the full display. But, in order to send those colors to the display, you would need to convert from the hue buffer to the 12bit RGB buffer, which is 576 bytes. So your total memory footprint before you even write code (which chews up memory with loops, if statements, etc) is going to be 960 bytes. So you have 64 bytes left for everything else. and I mean everything else. There's just no way that can be done.
So obviously, I moved to a larger and more powerful controller ASAP.
Ok, Ok, I lied, I wasn't using the Arduino Mega just yet when that video was made, but I was finding out very quickly that the scale and scope of my project would require, nay necessitate the use of a controller with more memory. In fact, probably a lot more. Hence the use of the Mega with it's 8kB of memory. I haven't run into a (memory related) problem since.
Saturday, February 12, 2011
DPHP 4 - Rewriting History... In Code
Suffice it to say, I won't make this one very long. Not everyone can read about coding approaches and enjoy it. I guess I can liven things up a bit with some of my youtube work.
With rainbowduinos in hand, I began to code. I had to open up the capabilities of the rainbow to allow for more direct control from a master arduino. Specifically, the rainbows came with no way to send 'pixel by pixel' information, only text characters and a few other simplistic functions. I changed that pretty quickly. Well, quickly in relative terms to the total ungodly amount of time I've spent on this.
From there I included what I like to call chromatics. These were abbreviated data structures that would use a simple on/off state for each pixel, and then apply a color to all of the pixels. With that I made monochromatic, dichromatic, and trichromatic data types for one, two, and three colors respectively. This reduced the bottle necking of my kludged together rainbowduino code. I've since abandoned that code set, but I keep the data types living on in a fair number of my animations.
From there I made my first animations. Not rocket science all of them, I admit, but it warmed me of to the methods and concepts of matrix and display manipulation that would become the bread and butter of most of my code.
And finally, I made my one of my first masterpieces. One of the original 'when pigs fly' ideas I had at the very beginning of the project in 2006. Ideas I had had but over the following years had taken on a sort of mythical status, something that would disappear into the pages of history unrecorded. But, after days of trial and error, reteaching myself the fundamentals of programming, and one of the most convoluted and painful debugging sessions in my life, I had accomplished the impossible. I had made a spectrum analyzer, one that responded to sound. I had fulfilled one of my original requirements for the project.
Enjoy.
Thursday, February 10, 2011
DPHP 3 - Electronics Genesis
Onto the start of the heart and soul of the project. I'm sure for most the helmet itself would seem like the fulcrum upon which the rest of the project pivots, and you're probably right. But if you want to talk about where most of the development hours, effort, learning, blood, sweat, and tears (honestly) went in this project, it would be into the electronics.
From the get go I knew this was going to be the biggest part of the project, which more than anything else the functionality of the LEDs and all that would make or break the project. It was where things would shine, where things that had never existed would be created, where I could be a true innovator. And also the area where I knew almost nothing.
I often tell the story of how I became an aerospace engineer when I explain what it was like getting into the electronics of this project.
Today will be no exception.
Freshman year at university, like many others, I knew roughly what I wanted to study. Luckily, all freshman are taking general required classes their first year anyways, so they get the year to also take some intro classes. I had built many a gaming desktop in my teens and loved the power and flexibility inherent in a computing platform, so naturally I thought computer science would be the major for me. My intro to programming class taught me otherwise.
We programmed in a rather arcane language that was LISP based, which to this day I have no idea what that implies other than it's not C based (like C, C++, java, and oodles more). For one nights homework I spent three hours debugging my code until I realized I had misspelled LAMBDA. That's how hard it was to code in this language. That's how bad the editor was at pointing out compile time errors (which to this day I don't think it could throw compile time errors, it was all or nothing). That's how annoying it was for me, the king of spelling mistakes. And that's how I didn't become a Comp Sci major.
Conversely, my intro to aerospace class was completely different. We built all kinds of things, from paper clip parachutes to radio controlled helium balloon racers. We did math that (although simplified) was the same math you used to get something into space. We looked at the fundamentals of how the whole commercial air travel business was one giant, well balanced, and sometimes broken equation. It was interesting, and that's why I became an aerospace major.
Despite going into aerospace, I still had to learn to code. You can't be an engineer today (or even a mathematician or scientist) without at least being able to write an integrator in excel, or use data analysis functions in MATLAB. But on the first programming homework assignment, which was in the Ada95 language, I knew I had picked the right major. I had a number of spelling and syntax mistakes, and for each one the compiler caught it. For each one it even would pop up a little text string at the bottom asking "I noticed you put a ':' here when you probably meant to put a ';' , would you like me to change it?". Ok, it may not have been exactly like that, but to a person who is plagued with spelling and syntax problems, it was a godsend. I had picked the right major.
So hopefully now you understand what it was like in the early days of this project. What comes next (or more likely many installments from now) may astound you, but keep in mind it comes from the same mind that coded three different line drawing functions of his own before stumbling onto Breshenham's line algorythm. It hasn't been easy.
So when did electronic genesis happen? Some time in June or July of 2009. When I discovered the Rainbowduino from Seeed Studio. No, that's not a typo.

In the year preceding I had learned about row & column multiplexing, current sinks and sources, persistence of vision, and all that good stuff. But I barely new anything beyond basic V=IR circuit, and even less about microcontrollers. I had built an RFID door unlocker with a servo to pull the door handle, but that was largely from borrowed code and ideas from other peoples projects. And looking back the code was so hideous it makes me cringe. There was no way I was going to be able to build my own circuit to drive all of those LEDs. I had to have an off the shelf solution, at least to get me started otherwise it would have been far too overwhelming.
I knew of Sparkfun and their SPI based LED matrices. But they weren't ideal. SPI sounded really scary, what with the very loose standards surrounding it, and Spark's example code was even more off putting. Plus, the pin-out of the backpack board was designed for a specific matrix, and that pin-out was all over the place with no apparent rhyme or reason. It would have been incredibly painful to hard wire the helmet display given the lack of order.
Then I found the rainbowduino.
It was RGB, so lots of colors. Joy.
It was based on a ATMega168, and the code was in the arduino language. Joy joy.
It was cheap, way cheaper than Sparkfun's offering. Joy of all joys.
So I put in an order for 6 of them and 6 prefabbed matrices for prototyping purposes.
From the get go I knew this was going to be the biggest part of the project, which more than anything else the functionality of the LEDs and all that would make or break the project. It was where things would shine, where things that had never existed would be created, where I could be a true innovator. And also the area where I knew almost nothing.
I often tell the story of how I became an aerospace engineer when I explain what it was like getting into the electronics of this project.
Today will be no exception.
Freshman year at university, like many others, I knew roughly what I wanted to study. Luckily, all freshman are taking general required classes their first year anyways, so they get the year to also take some intro classes. I had built many a gaming desktop in my teens and loved the power and flexibility inherent in a computing platform, so naturally I thought computer science would be the major for me. My intro to programming class taught me otherwise.
We programmed in a rather arcane language that was LISP based, which to this day I have no idea what that implies other than it's not C based (like C, C++, java, and oodles more). For one nights homework I spent three hours debugging my code until I realized I had misspelled LAMBDA. That's how hard it was to code in this language. That's how bad the editor was at pointing out compile time errors (which to this day I don't think it could throw compile time errors, it was all or nothing). That's how annoying it was for me, the king of spelling mistakes. And that's how I didn't become a Comp Sci major.
Conversely, my intro to aerospace class was completely different. We built all kinds of things, from paper clip parachutes to radio controlled helium balloon racers. We did math that (although simplified) was the same math you used to get something into space. We looked at the fundamentals of how the whole commercial air travel business was one giant, well balanced, and sometimes broken equation. It was interesting, and that's why I became an aerospace major.
Despite going into aerospace, I still had to learn to code. You can't be an engineer today (or even a mathematician or scientist) without at least being able to write an integrator in excel, or use data analysis functions in MATLAB. But on the first programming homework assignment, which was in the Ada95 language, I knew I had picked the right major. I had a number of spelling and syntax mistakes, and for each one the compiler caught it. For each one it even would pop up a little text string at the bottom asking "I noticed you put a ':' here when you probably meant to put a ';' , would you like me to change it?". Ok, it may not have been exactly like that, but to a person who is plagued with spelling and syntax problems, it was a godsend. I had picked the right major.
So hopefully now you understand what it was like in the early days of this project. What comes next (or more likely many installments from now) may astound you, but keep in mind it comes from the same mind that coded three different line drawing functions of his own before stumbling onto Breshenham's line algorythm. It hasn't been easy.
So when did electronic genesis happen? Some time in June or July of 2009. When I discovered the Rainbowduino from Seeed Studio. No, that's not a typo.
In the year preceding I had learned about row & column multiplexing, current sinks and sources, persistence of vision, and all that good stuff. But I barely new anything beyond basic V=IR circuit, and even less about microcontrollers. I had built an RFID door unlocker with a servo to pull the door handle, but that was largely from borrowed code and ideas from other peoples projects. And looking back the code was so hideous it makes me cringe. There was no way I was going to be able to build my own circuit to drive all of those LEDs. I had to have an off the shelf solution, at least to get me started otherwise it would have been far too overwhelming.
I knew of Sparkfun and their SPI based LED matrices. But they weren't ideal. SPI sounded really scary, what with the very loose standards surrounding it, and Spark's example code was even more off putting. Plus, the pin-out of the backpack board was designed for a specific matrix, and that pin-out was all over the place with no apparent rhyme or reason. It would have been incredibly painful to hard wire the helmet display given the lack of order.
Then I found the rainbowduino.
It was RGB, so lots of colors. Joy.
It was based on a ATMega168, and the code was in the arduino language. Joy joy.
It was cheap, way cheaper than Sparkfun's offering. Joy of all joys.
So I put in an order for 6 of them and 6 prefabbed matrices for prototyping purposes.
Wednesday, February 9, 2011
DPHP 2 - Design Docs & The Age of PowerPoint
During all of the CAD work that took place, I began to flesh out the specifications that would make up the rest of the project. Here they are in no particular order, although accompanies by nice little blurbs about how they came to be.
A resolution of 16 wide by 24 tall
I was loony enough to count the LEDs on the original Guy-Man helmet at one point. I think it was something like 15 wide by 33 tall. That seemed a really arbitrary number, so I settled on 16x24. It was a multiple of 8, the number of bits in a byte, often a good thing when working with microcontrollers and computers. it's magically become the ideal size/resolution for innumerable reasons since then.
RGB color scheme
In one of the many aspects of this project that "one ups" the original, I chose to have an RGB (red green blue) color scheme rather than the RGY (red green, combined yellow) of the original helmet. It seems like in decade or so since Daft Punk's robot debut, things should advance a bit. Whats one more color right? With RGB, I can replicate (most of) the rainbow.
Heads up display
This came largely out of necessity at first, but of course needed to be one upped on it's own. At first it was a small CMOS camera combined with a pair of video goggles, like the kind you find in the back of the Sky Mall magazine. But if one has a camera and video goggles, one should naturally include an onscreen overlay status display, right?
Suspension of disbelief
This was largely an approach, more than a feature. Call it the Turing test of a robot costume. I wanted to have a conversation (albeit limited) with someone without it them pausing to think what's going on. I didn't want to be the man in the suit or the man pulling the strings. I didn't want there to be a man at all, at least in peoples eyes. You'll see this idea at the heart of a lot of the work on this project as we go along.
Local control
largely connected to the above point, I want to be in control, inside the outfit. It's not a narcissism (not too much anyway) but again to remove the puppet and strings problem. It's no fun to be pulling the strings, and it's no fun to be pulled either.
Portable power
What fun is all this is it can't run on batteries? Who want's to hop from power outlet to power outlet at a convention? Who wants to explain that the getup is a lot cooler if it's plugged in? All I can say is thank the powers that be for lipo batteries.
Personal cooling
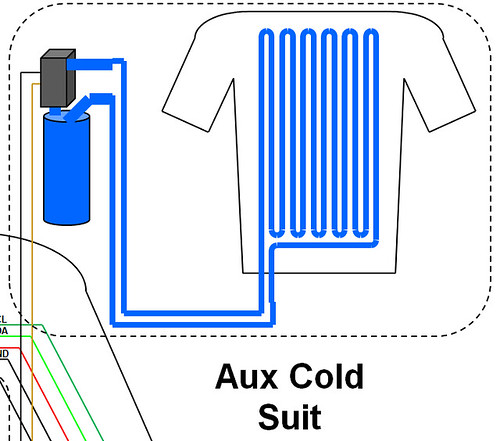
Fans. the helmet is going to need a number of fans. You know, race car drivers have those water cooled undergarments as well...
Sound input
Daft Punk are all about the music, why shouldn't a replica be as well. Stay tuned.
As practical as possible
Clearly the helmet is going to have some heft. Clearly, there are going to be a lot of wires and a lot of connectors. Clearly I will have limited mobility and vision. Clearly I will need a bouncer/handler to keep an eye on me and an eye out for me. But how clearly will I be able to see in low light conditions? There's a fix for that too.
I have powerpoint upon powerpoint of ideas I've had, wiring diagrams, cheat sheets, and even more in sketch books.We'll call this the starting point for the cliff notes.
A resolution of 16 wide by 24 tall
I was loony enough to count the LEDs on the original Guy-Man helmet at one point. I think it was something like 15 wide by 33 tall. That seemed a really arbitrary number, so I settled on 16x24. It was a multiple of 8, the number of bits in a byte, often a good thing when working with microcontrollers and computers. it's magically become the ideal size/resolution for innumerable reasons since then.
RGB color scheme
In one of the many aspects of this project that "one ups" the original, I chose to have an RGB (red green blue) color scheme rather than the RGY (red green, combined yellow) of the original helmet. It seems like in decade or so since Daft Punk's robot debut, things should advance a bit. Whats one more color right? With RGB, I can replicate (most of) the rainbow.
Heads up display
This came largely out of necessity at first, but of course needed to be one upped on it's own. At first it was a small CMOS camera combined with a pair of video goggles, like the kind you find in the back of the Sky Mall magazine. But if one has a camera and video goggles, one should naturally include an onscreen overlay status display, right?
Suspension of disbelief
This was largely an approach, more than a feature. Call it the Turing test of a robot costume. I wanted to have a conversation (albeit limited) with someone without it them pausing to think what's going on. I didn't want to be the man in the suit or the man pulling the strings. I didn't want there to be a man at all, at least in peoples eyes. You'll see this idea at the heart of a lot of the work on this project as we go along.
Local control
largely connected to the above point, I want to be in control, inside the outfit. It's not a narcissism (not too much anyway) but again to remove the puppet and strings problem. It's no fun to be pulling the strings, and it's no fun to be pulled either.
Portable power
What fun is all this is it can't run on batteries? Who want's to hop from power outlet to power outlet at a convention? Who wants to explain that the getup is a lot cooler if it's plugged in? All I can say is thank the powers that be for lipo batteries.
Personal cooling
Fans. the helmet is going to need a number of fans. You know, race car drivers have those water cooled undergarments as well...
Sound input
Daft Punk are all about the music, why shouldn't a replica be as well. Stay tuned.
As practical as possible
Clearly the helmet is going to have some heft. Clearly, there are going to be a lot of wires and a lot of connectors. Clearly I will have limited mobility and vision. Clearly I will need a bouncer/handler to keep an eye on me and an eye out for me. But how clearly will I be able to see in low light conditions? There's a fix for that too.
I have powerpoint upon powerpoint of ideas I've had, wiring diagrams, cheat sheets, and even more in sketch books.We'll call this the starting point for the cliff notes.
Tuesday, February 8, 2011
DPHP 1 - The Beginnings
I've decided that I'm going to part and parcel up the posts related to the Daft Punk Helmet Project, at least until the point where I'm up to date with current events. So allow me to start with the project at it's earliest inception.
The start date for the maelstrom of ideas that would evolve and become DPHP was mid October, 2006. I was talking with an old friend from high school about Daft Punk, a musical duo I had 'gotten back into' after discovering the full Interstella 5555 movie (and not just the handful of music videos) and the fairly recent release of their Human After All album. I had managed to get my friend interested enough to watch Interstella 5555 (house/electronica really wasn't his scene so the music was lost on him). After having scene the film, the conversation when something like this:
Friend: Dude! you should totally go as one of the guy from that movie for Halloween!
Me: You'll need to be more specific, there were bunches of people in the movie, all of them cartoons technically.
Friend: The robot guys you were talking about! Daft Junk or whatever. You should totally put all those lights in it and stuff! That would be sweet!
Me: Um, A) Halloween is like 10 days way, B) that requires a bunch of tools I don' have access to, and C) I'm aerospace, not electrical engineering. I'd have no idea where to start with the electronics.
Friend: But you go to [leading engineering university].
Those last four words would be my undoing, so to speak. With that I took up the mantle, the challenge of building a replica Guy-Manuel de Homem-Christo. But it wasn't to be just any replica. I had to improve upon every aspect of the original design. You'll slowly find out about all that as we go along.
So with the gauntlet thrown down, I decided to begin with generating a solid CAD model of the helmet. I knew that I wouldn't be making the helmet any time soon, but I liked the project simply as a technical exercise. I'd spent the previous summer CAD'ing up my own version of the Vic Viper ship from the Gradius series of games. I learned a lot in that process, and figured the Guy-Man helmet would be a nice new project.
So, who wants pretty pictures? Thought so.
This is the very first model I ever made of the helmet, Round 1, in stunning technicolor. Eh, maybe not the last bit. Looking back it was an extremely rough model based on some even worse references. I used two screen grabs from the 'Grammys' sequence of Interstella 5555. Needless to say they had all kinda of issues, including simulated lens distortion. It gets better trust me.
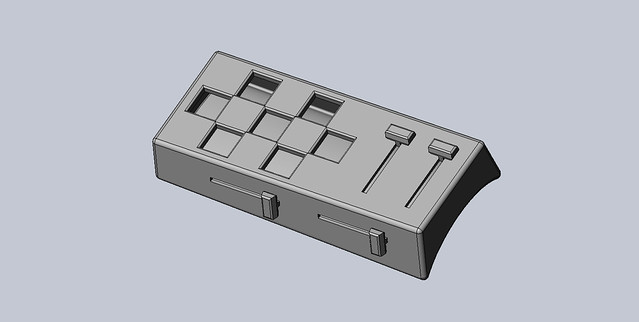
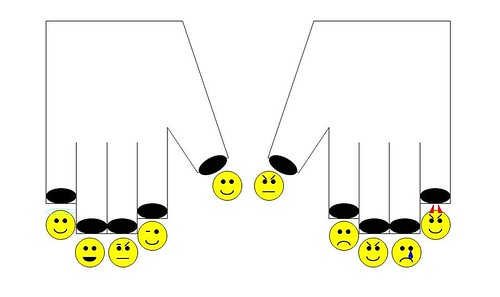
Along with that design I had the 'rather outdated' control system in the form of arm mounted control panels. Needless to say not the easiest things to operate in armored gloves and a helmet full of lights. Still, not bad looking if I do say so myself.
The second generation of the helmet, known as Amped. I had learned a lot from the first one, and started replacing a massive number of the features that made up the helmet. I sloped in the sides for a more organic look. The chin angled down more and it's bottom curled under, again, making it more organic and lifelike. This is where it started to look like something 'Human After All.'
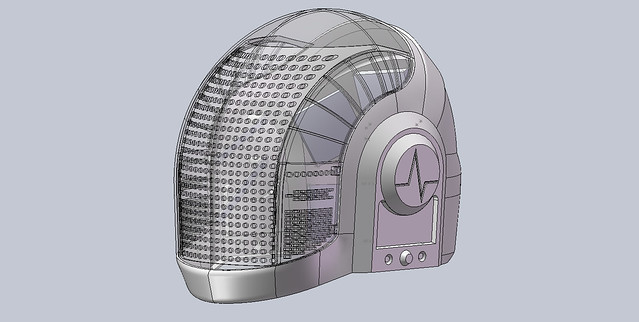
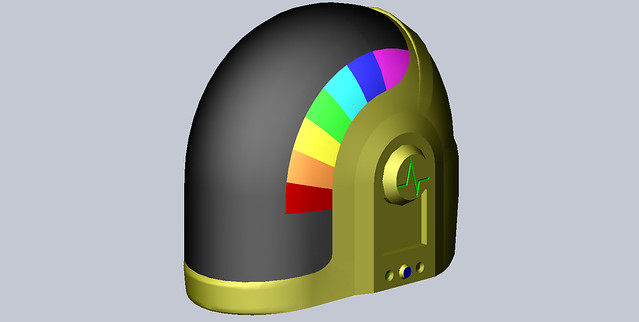
When stuff started getting really complicated, aka Amplified. Largely based off of the previous Amped generation, though again with some of the features improved in an almost indistinguishable way. What I really spent my effort on was making it practical and manufacture-able. I included the 'sub-visor' which would hold all of the main display LEDs, the side bars, auxiliary LEDs, so on and so forth. If you look really carefully, you'll even see the 'swing arms' from a dead design decision. In the interest of ventilation and ease of wear-ability, I thought it would be a nice feature to have the visor hinge open. Needless to say it was a complicated concept and died very quickly along the way.
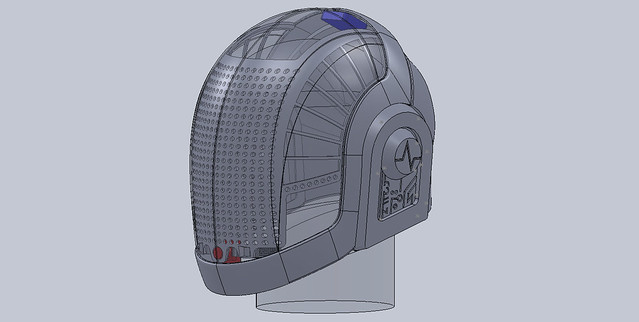
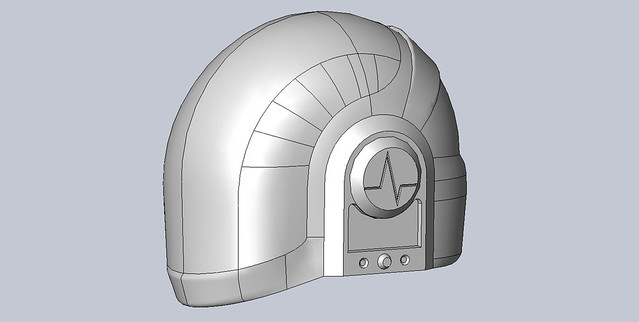
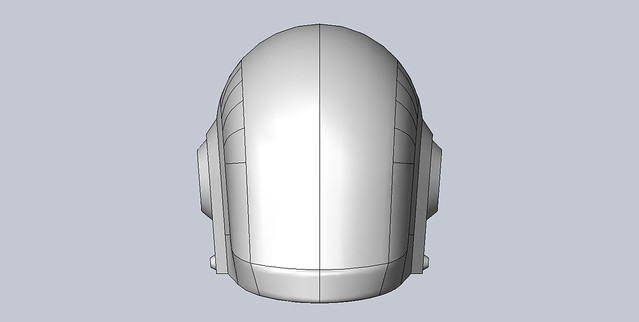
And this is very close to what we're working with right now, almost. This is far more attractive design, isn't it? Angular, sweeping, contoured, organic, and whatever industrial design buzz words you want to use. Needless to say it's damn close to the real thing, but with my own twist and opinion on the design. I guess this is as good a place to stop as any. We'll get to all the colored bits you see in due time, I promise.
The start date for the maelstrom of ideas that would evolve and become DPHP was mid October, 2006. I was talking with an old friend from high school about Daft Punk, a musical duo I had 'gotten back into' after discovering the full Interstella 5555 movie (and not just the handful of music videos) and the fairly recent release of their Human After All album. I had managed to get my friend interested enough to watch Interstella 5555 (house/electronica really wasn't his scene so the music was lost on him). After having scene the film, the conversation when something like this:
Friend: Dude! you should totally go as one of the guy from that movie for Halloween!
Me: You'll need to be more specific, there were bunches of people in the movie, all of them cartoons technically.
Friend: The robot guys you were talking about! Daft Junk or whatever. You should totally put all those lights in it and stuff! That would be sweet!
Me: Um, A) Halloween is like 10 days way, B) that requires a bunch of tools I don' have access to, and C) I'm aerospace, not electrical engineering. I'd have no idea where to start with the electronics.
Friend: But you go to [leading engineering university].
Those last four words would be my undoing, so to speak. With that I took up the mantle, the challenge of building a replica Guy-Manuel de Homem-Christo. But it wasn't to be just any replica. I had to improve upon every aspect of the original design. You'll slowly find out about all that as we go along.
So with the gauntlet thrown down, I decided to begin with generating a solid CAD model of the helmet. I knew that I wouldn't be making the helmet any time soon, but I liked the project simply as a technical exercise. I'd spent the previous summer CAD'ing up my own version of the Vic Viper ship from the Gradius series of games. I learned a lot in that process, and figured the Guy-Man helmet would be a nice new project.
So, who wants pretty pictures? Thought so.
This is the very first model I ever made of the helmet, Round 1, in stunning technicolor. Eh, maybe not the last bit. Looking back it was an extremely rough model based on some even worse references. I used two screen grabs from the 'Grammys' sequence of Interstella 5555. Needless to say they had all kinda of issues, including simulated lens distortion. It gets better trust me.
Along with that design I had the 'rather outdated' control system in the form of arm mounted control panels. Needless to say not the easiest things to operate in armored gloves and a helmet full of lights. Still, not bad looking if I do say so myself.
The second generation of the helmet, known as Amped. I had learned a lot from the first one, and started replacing a massive number of the features that made up the helmet. I sloped in the sides for a more organic look. The chin angled down more and it's bottom curled under, again, making it more organic and lifelike. This is where it started to look like something 'Human After All.'
When stuff started getting really complicated, aka Amplified. Largely based off of the previous Amped generation, though again with some of the features improved in an almost indistinguishable way. What I really spent my effort on was making it practical and manufacture-able. I included the 'sub-visor' which would hold all of the main display LEDs, the side bars, auxiliary LEDs, so on and so forth. If you look really carefully, you'll even see the 'swing arms' from a dead design decision. In the interest of ventilation and ease of wear-ability, I thought it would be a nice feature to have the visor hinge open. Needless to say it was a complicated concept and died very quickly along the way.
And this is very close to what we're working with right now, almost. This is far more attractive design, isn't it? Angular, sweeping, contoured, organic, and whatever industrial design buzz words you want to use. Needless to say it's damn close to the real thing, but with my own twist and opinion on the design. I guess this is as good a place to stop as any. We'll get to all the colored bits you see in due time, I promise.
Monday, February 7, 2011
Hi, I'm Scott, and I live on a 3 Name Basis
Yep, you read that right. I live on a three name basis. Why? Well, I have the (mis)fortune of having three boys' first names as my first, middle, and last name. I've gone by the first and last name interchangeably most of my life, but sadly people have also called me by the middle name expecting a response. This has been out of necessity. Every teacher I ever had would see the last name on the attendance sheet and instinctively call me by that name. It's become a pet peeve, like people touching my hair, but that's a story for a different day.
Why do I feel the need for a blog? Well, largely, as a central place to deposit all of the work I've been doing on my Daft Punk Helmet Project, an attempt to recreate a Guy-Manuel helmet with all the trimmings, except that the design has been turned up to eleven more times than I can count. Suffice it to say, the design has inclusions for everything.
I won't pigeon hole my posts to just that project, however. Maybe I'll touch on life lessons, maybe I'll touch on productivity tweaks, maybe I'll rant a bit. You'll just have to see. Let's hope it's not boring.
Subscribe to:
Comments (Atom)